

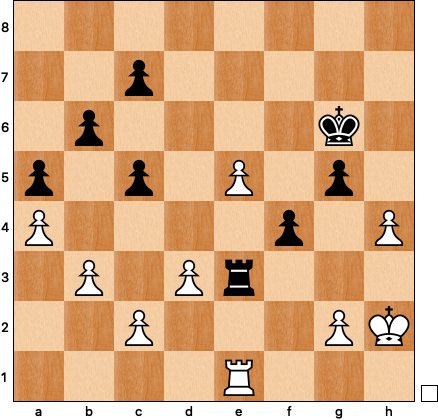
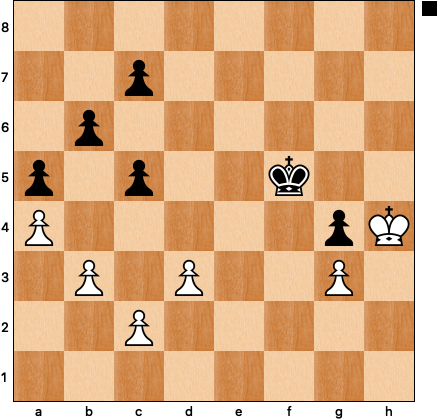
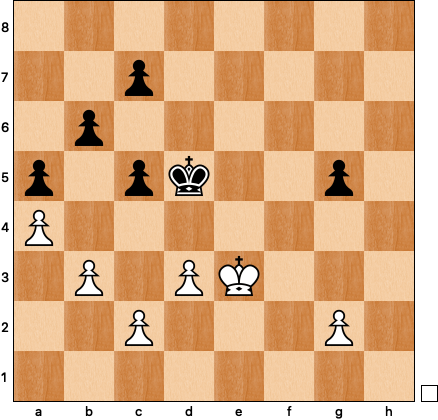
Every so often you stumble across a position so thematic that it could stand in for an entire section of a middlegame or endgame manual. This was the feeling I got from the final stage of the game between Keymer and Vidit at the recently completed FIDE Grand Swiss, a king and pawn ending that incorporated almost every theme1 found in Dvoretsky or Fine. What’s more, it’s another example of a very strong grandmaster losing a drawn pawn endgame, something that makes me feel better about my own blunders. Here’s the starting position, with the analysis that follows divided by theme:
Zwischenzug
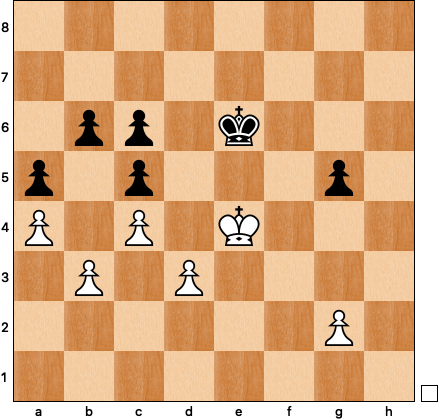
The position calls for a trade of rooks, but before the pure pawn ending there are sometimes chances for tricks, and Keymer found a nice one. Had he played the pedestrian 38 Rxe3 fxe3 39 Kg1 gxh4 40 Kf1 Kf5 41 Ke2 Kxe5 42 Kxe3 Kf5 it’s nothing more than a quick handshake:
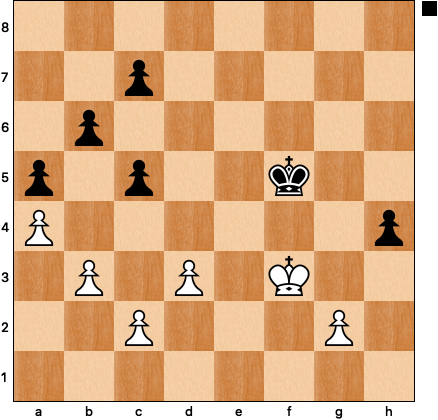
Black can shuffle his king between f5 and g5, denying white’s king access to g4 while using the threat of counterplay against g2 to stop an incursion on the queenside.
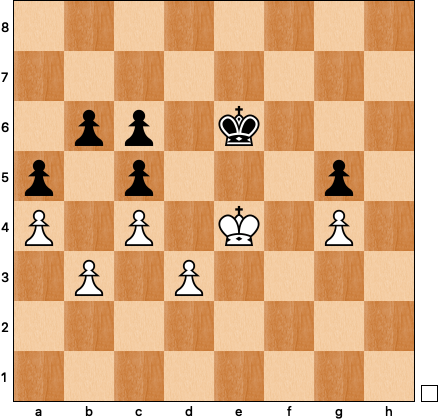
Keymer played 38 h5+! instead. The position is still theoretically drawn, but the pawn on g5 limits black’s flexibility, making the path far more treacherous.
Square of the Pawn
After 38 … Kxh5 39 Rxe3 fxe3 white had to be just a tiny bit careful:
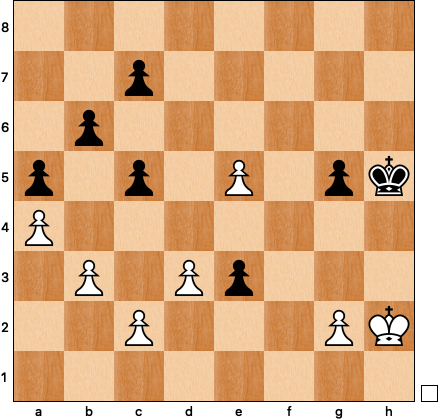
White’s king is outside the square of the pawn (the box g1-g3-e3-e1) and has to step into it to stop black’s passer. 40 Kg3? would be a terrible mistake: 40 … g4! and the white king is frozen forever. The only way forward is back: 41 Kg1 Kg6 42 Kf1 Kf5 43 Ke2 Kxe5 44 Kxe3.
No elite GM is going to blunder Kg3 in a classical game, but I’ve made this kind of reflexive mistake in blitz on a number of occasions — my instincts tell me to go forwards, always forwards.
Outflanking
We left off in this position after white’s 44th move:
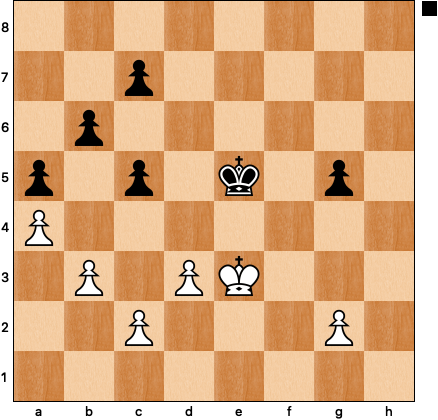
Black’s lost the game with his next move, but before we analyze it, let’s consider 44 … Kf5? This defense works fine with the pawn on h4 (see diagram 2), but fails miserably with the pawn on g5: 45 Kf3 Ke5 46 Kg4 Kf6 47 Kh5 Kf5 48 g3 g4 49 Kh4:
Black’s king has been outflanked to the h-file and he finds himself in zugzwang. His one remaining pawn move, c7-c6, will be met by c2-c4, and then he must say goodbye to the g-pawn.
Reserve Tempo
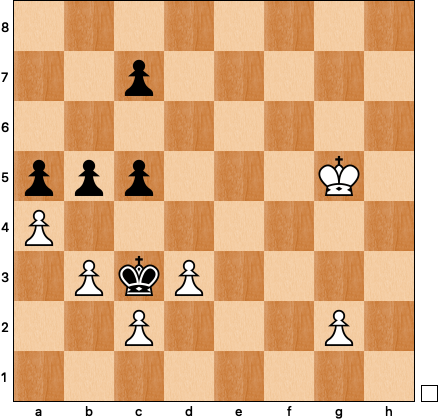
Back to diagram 4. Under very unpleasant pressure, Vidit played 44 … c6? Given the state of the opposition, it seems natural to pass the move back to white, but this was black’s last reserve tempo, his only way to avoid zugzwang in the future. The game continued 45 c4 Kf5 46 Kf3 Kf6 47 Ke4 Ke6 and white’s g-pawn represents the only way to waste a move — it’s two reserve tempi to zero in white’s favor:
Black is basically helpless, as he can only make moves with his king while waiting for the final blow. Keymer executed the winning plan nicely, first by fixing the g-pawns: 48 g3! (48 g4? is only a draw) 48 … Kf6 49 g4 Ke6.
Widening the Beachhead
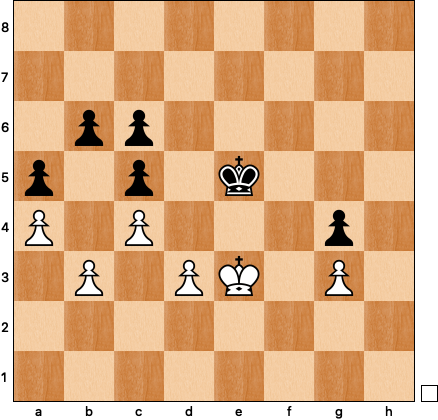
Dvoretsky defines this technique as “trading off pawns, with the idea of clearing a path for the king,” demonstrating the idea with the famous game Cohn-Rubenstein2. Our pawn endgame provides another good example, as after black’s 49th white’s king cannot make further progress on its own:
Keymer turned to the unfixed queenside pawns to make use of his active king. The first crack in the black’s defensive armor was 50 d4 cxd4 51 Kxd4 with an initial zugzwang3. 51 … Kf6 loses to 52 c5, so Vidit tried 51 … Kd6, after which white further widened the beachhead: 52 c5+! bxc5 53 Kc4.
Pawn Race
The wreckage of Vidit’s queenside forced him to seek counterplay on the kingside instead: 53 … Ke5 54 Kxc5 Kf4:
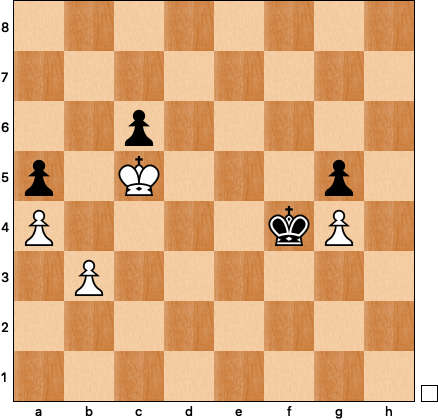
This position is a good reminder of the simplest way to calculate pawn races: count the moves needed by each side to queen4. White takes five moves: b4xa5-a6-a7-a8. Black needs six: Kxg4-Kf3-g4-g3-g2-g1. With white to move that’s an easy win, starting with 55 b4 axb4 56 Kxb4, and Vidit eventually resigned.
Breakthrough
How could black have held the game? Way back at diagram 4 he needed to find 44 … Kd5!
White’s most obvious plan is to return to the outflanking maneuver with 45 Kf3. Now 45 … Ke5 46 Kg4 Kf6 47 Kh5 is a return to our previous analysis, but 45 … Kd4! 46 Kg4 Kc3 47 Kxg5 b5! saves the game thanks to this pretty breakthrough5:
Now we’re back to counting moves. White needs six to queen on the g-file (Kf5-g4-g5-g6-g7-g8), as does black (Kxc2xb3, bxa4-a3-a2-a1). If the pawn sacrifice is accepted, then 48 axb5 Kxc2 49 Kf5 Kxb3 50 g4 a4 is also drawn.
Mined Squares
Let’s give it one last try. From diagram 9 white can try to keep the black king out of the queenside by playing 45 c3. Some shuffling follows: 45 … Ke5 46 g3 Kf5 47 Kf3 c6 48 c4 g4+ 49 Ke3 Ke5:
Black to move in this position would lose — the square e5 is mined for him, just as the d2 square is mined for white. Dvoretsky says “Do not be the first to step on a mined square, or you’ll be ‘blown up’ — that is, fall into zugzwang.” White loses after 50 Kd2 Kd4, but 50 Ke2 sets a little trap: 50 … Kd4? 51 Kd2 Ke5 52 Ke3 and now it’s black’s move in the zugzwang position. Once again, backwards (or to the side) is best. With white’s king on e2, black slides to e6 or f5, ready to occupy e5 only in response to Ke3.
It’s hard to say exactly what Vidit missed, but Keymer’s winning idea is an important one for anyone seeking to grind out wins in the endgame. Rather than acquiesce to a simple draw, he threw in the move h4-h5+ and forced black onto a tightrope where any wrong step meant disaster. I’d generally expect someone as strong as Vidit to find all the right moves and hold the game, but it’s always worth testing the opponent’s form and technique. You could say that Keymer got lucky, but he created the conditions for good luck to arrive.
For the true endgame aficionados, I’m sorry to say that there are no study-like corresponding squares problems to solve here.
Starting from the king and pawn ending on move 25.
This helps explain the difference between playing g3 and g4 on move 48. Had Keymer played the latter it would be white’s move in this position and the game would be drawn.
Just as long as the opponent’s king can’t interfere and there aren’t any tricky checks.
Kudos to the machine for playing this to hold the position against me when we sparred, although it’s worth noting that black can draw with b6-b5 a move earlier or later.
A veritable classic. Thanks for writing it up so clearly for students of the royal game.
This post is a true treasure trove of king and pawn endings!